
This is the second post in a series of articles that will describe what’s really inside NTDS.dit and how Active Directory works on the database layer, In an earlier post I explained the tables within NTDS.dit in detail as far as what they are used for, in which release of Active Directory (Windows Server) they were introduced in, as well any major changes being added in later versions: How the Active Directory – Data Store Really Works (Inside NTDS.dit) – Part 1
This post will go into the details of the contents of the “datatable” also known as the object store – that contains all objects and phantoms [1.1] represented as rows (1 object/phantom = 1 row in the table) from any instanced naming context (NC) held as either writable or read-only (until they are physically removed by the garbage-collector) by the Directory System Agent (DSA) hosting the database and where columns represent every [1:3] attribute present in the schema except linked attributes [1:2]
[1.1]: phantoms are references to object’s hosted outside the given database (NTDS.DIT) and the given Directory System Agent (DSA) – (Except structural phantoms)
[1:2] Post-Windows Server 2003 the attribute “ntSecurityDescriptor” is stored in the “sd_table” rather than in the “datatable”
[1:3] Some columns doesn’t reflect attributes and are columns pre-defined in the NTDS.dit template database generated by Microsoft (those are needed for internal states to the DSA)
Maintain the hierarchy of an object tree within a flat object store
The hierarchy in Active Directory is quite obvious to most of us at a simplified layer e.g. daily administrative task such as creating an Organizational Unit and creates several descendent/child objects under neat it, some people may refer to some objects as leaf objects (object that usually don’t contain descendent/child objects) such as object of the class “user” – However the fact is that any object within Active Directory has the possibility (technically) to contain one or more descendent/child objects – this is controlled by schema constrains and more specifically the sum of the following attributes of a given object class and any inherited class (except for auxiliary classes) :
Table 1: Possible Superiors
|
Attribute |
Description |
| possSuperiors | Contains references to object classes that can host the given as a descendent/child object.
possSuperios can be modified on both cat1 and cat2 schema class object’s after that they have been instantiated in the schema. |
| systemPossSuperiors | Contains references to object classes that can host the given as a descendent/child object.
systemPossSuperiors can’t be modified from the outside, once being instanced after the initial creation of the class within the schema. |
Why it’s easy for all objects to host descendants/child objects becomes more obvious when the hierarchy is explained at the DBLayer.
The question remains with the details given above, if one row within the “datatable” represents an object/phantom, how can the hierarchy be maintained? The below table “Table 2” represent columns in the “datatable” that are vital for representing/building the hierarchy in the directory at the DBLayer.
Table 2: datatable – Simplified for hierarchy representation 1
|
Name |
ESE Data Type |
ESE Column Options (grbit) |
Description |
| DNT_col | JET_coltypLong | JET_bitColumnFixed, JET_bitColumnAutoincrement |
Every object/phantom within the “datatable” contains a unique DNT value.
DNT is a short for distinguished name tag. ESE enforces uniqueness by declaring DNT to be an ESE auto-incrementing column (JET_bitColumnAutoincrement.) DNT is the primary key of the “datatable”, so [2.1] objects are clustered in storage by DNT, and access to an object by DNT is more efficient than access via any other column/attribute. Since new objects are created in ascending DNT order, the primary key organization does not slow down the creation of new objects. |
| PDNT_col | JET_coltypLong | JET_bitColumnFixed | The PDNT column holds the DNT of the parent of an object [2.2].
PDNT is a short for parent distinguished name tag. The tree structure of objects is not represented by pointers from parent to child, as you might expect given how the tree is normally browsed, but by a pointer in each child object/row to its parent |
| RDNTyp_col | JET_coltypLong | JET_bitColumnFixed | The RDNTyp_col holds the attributeID to the attribute being used as RDN, typically: cn (Common-Name), ou (Organizational-Unit), dc (Domain-Component), o (Organization) [2:3] |
[2.1]: The maximum numbers of objects/phantoms that ever can be created on a given DSA (Domain Controller) for its entire life time is 2 billion objects (147,483,393 (231 minus 255)). Note that this count against objects/phantoms ever introduced to the local DSA as part of any naming context (NC) writable or partial ever hosted by the DSA. * If the DSA is promoted by using IFM (Install from Media it inheritance the count of already allocated DNTs from the former DSA) – When the maximum numbers of auto-increment values has been used (the limit mention above have been hit) the following error are returned at the DBLayer: JET_errOutOfAutoincrementValues -1076 from the outside we will notice: “Error: Add: Operations Error. <1> Server error: 000020EF: SvcErr: DSID-0208044C, problem 5012 (DIR_ERROR), data -1076.” Read more about Active Directory Limits: http://technet.microsoft.com/en-us/library/active-directory-maximum-limits-scalability(v=ws.10).aspx#BKMK_Objects
[2.2]: The first row introduced in the “datatable” isn’t a real object nor is it a phantom and is named “$NOT_AN_OBJECT1$” and have its PDNT_col set to NULL.
The “PDNT_col” is indexed so becomes very easy to drive an object’s direct-descendants/child objects (not all descendants) by simply query who that has the object’s DNT in their PDNT_col.
[2:3] The DSA has an in-memory cache for the most common RDNs (the ones mentioned above)
Active Directory allows us to use a custom attribute as RDN as well by specify the attributeID of that custom attribute as the rDNAttID for the particular class. * A RDN attribute must have the syntax string **customization may not be supported by all LDAPv3 clients. *** rDNAttID should preferably be set before any objects of the given class is instanced in the directory (changes won’t apply to already instanced/existing objects)
Let’s apply “Table 2” to a theoretical sample:
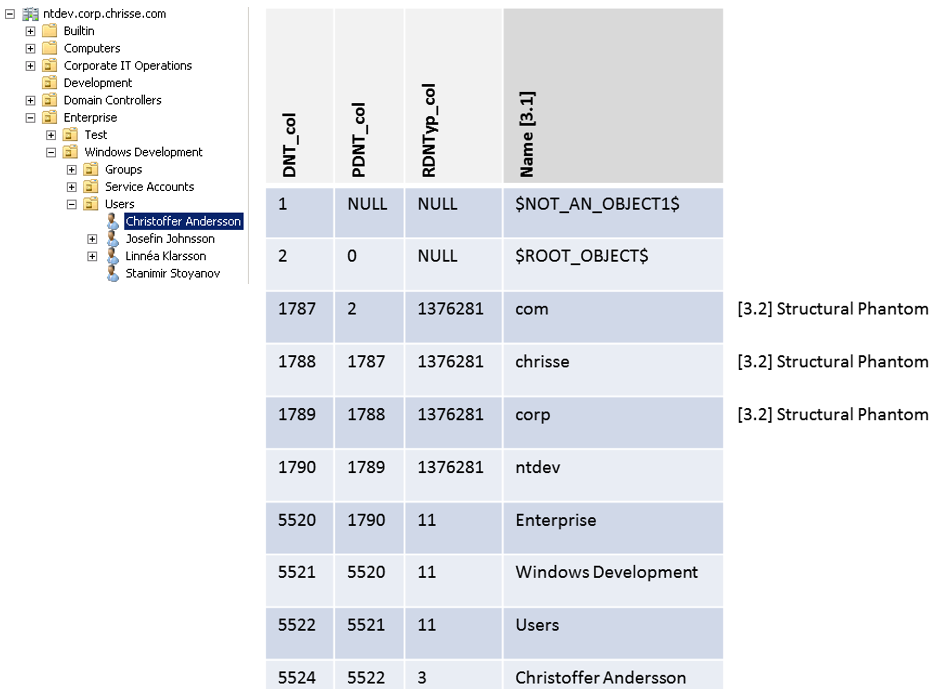
[3.1]: “Name” represent the RDN attribute, it’s not stored/named as described in the illustration above, it’s rather stored as “ATTm589825” I choose to represent it as “Name” for simplifying the understanding of the hierarchy in this case.
[3.2] Structural Phantom – (Different from a phantom used for reference integrity to real object’s hosted outside the given DIT) is used to represent the full distinguished name of the domain e.g “DC=ntdev,DC=corp,DC=chrisse,DC=com”
In the next article – we will continue the deep-dive into the content and the structure of the “datatable” – going thru things like ancestors, the difference between phantoms and real objects, tombstones and the garbage collector on the DBLayer and much more.


